
React’s “state” is one of the more difficult concepts to learn. Not just what to put in state, but what it actually is and what it’s for. And also how Redux is related to React state.
I hope to clear up some of the confusion in this article.
You Keep Using That Word…
First off, the word “state” is a little ambiguous. In one sense, “state” means the current visual representation of the app on screen. It could be in a “loading” state, or it could be in an “error” state. That’s not quite what it means in React parlance, though.
In the React sense, “state” is an object that represents the parts of the app that can change. Each component can maintain its own state, which lives in an object called this.state.
Simply put, if you’d like your app to do anything – if you want interactivity, adding and deleting things, logging in and out – that will involve state.
What React State Looks Like
Imagine you have an app that, at this particular moment in time, looks like this:
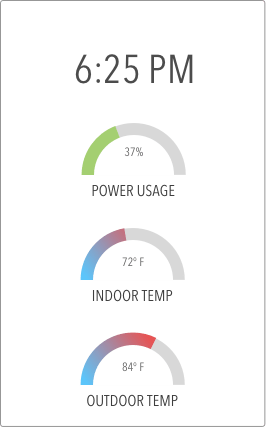
Looking at this image, pick out the parts that could change over time (yeah, that’s basically everything).
Now we can gave these things names (time, power usage, indoor temperature, outdoor temperature), and describe them with a JavaScript object like this:
{
  currentTime: "2016-10-12T22:25:42.564Z",
  power: {
    min: 0,
    current: 37,
    max: 100
  },
  indoorTemperature: {
    min: 0.0,
    current: 72.0,
    max: 100.0
  },
  outdoorTemperature: {
    min: -10.0,
    current: 84.0,
    max: 120.0
  },
  tempUnits: "F"
}
This object describes the entire state of this app. And that, in a nutshell, is what React’s state is for.
Notice that the fields don’t correspond perfectly with the UI. That’s ok. It’ll be easy enough to format the date, use the min and max values to draw the graphs to the correct scale, and so on.
The point remains: change the state object to change how the app looks.
Reader foobarwtf points out that min and max don’t change, and since they never change, why are they inside state? Well, it’s common to put responses from the server into state. If you fetch the current temperature data, and that data includes min and max, it’s best to save them inside state with the rest of it. Because, while it looks “obvious” that these values won’t change, you wouldn’t want to duplicate hard-coded values on both the server and client. What if the server changed its calibration? What if the user installed a 200A power system? And so on.
So: while state is generally reserved for things that change, it’s also a good place to put “volatile” information like data that came from a server call.
How To Change State
If anything in the state changes… say, the temperature goes up to 75° inside, the app should refresh to reflect that new reality. This is what React does when state is changed: it re-renders the entire app.
Here are some reasons why state might change:
- The user clicks or taps a button
- Some data is received from the server – either from a websocket message, or from a response to a previous request
- A timer goes off – perhaps there’s a timer that fires every second to update the current time onscreen
So, how does React know that state has changed? Is it continually polling for changes? Watching for events, like Angular does? Nope. Nothing that fancy.
React knows when state has changed because you tell it explicitly, by calling this.setState from inside a component. In other words, there’s no “magic.” React will only re-render when you tell it to.
State Changes in a Counter
The home monitor app above is a nice example of state in action, but I’m going to scale back to a simple “counter” app to show how state changes over time.
Here’s how it works:
- There’s a number displayed, starting off at 0
- You click a button (this causes a call to a
handleClickfunction you designate) - The counter increments by 1 (you call
setStateto make this happen) - React re-renders the app in response to the state change

Show Me The Code
Quick review:
- React maintains state as an object
- You can change that object by calling
setState - React will re-render every time you call
setState
Here are 2 more important points:
- You should NOT change
this.statedirectly, ever. Usethis.setState. - State changes are asynchronous. If you read from
this.stateimmediately after callingthis.setState, it probably won’t reflect the changes yet.
Here’s the code for that counter component above:
Visualize How The Code Runs With The Debugger
The devtools debugger is invaluable in tracking down bugs, but it’s also a great way to see the order in which your code runs. Set breakpoints at key locations and hit “Play” (or Refresh). Here’s how the counter app works:
Details, Details
In this article I’ve said state is a single object that describes the entire app – but in practice, it is broken down into smaller pieces. The best way to do this is to keep state in the “container” components, and keep it out of the “presentational” ones.
If you are using Redux, you actually will have one big state object that describes the entire app. That’s basically what Redux does: one huge object represents the app’s state, and then reducers and mapStateToProps carve it up into pieces relevant to each component.
I hope this helped clarify state for you. Leave any questions or comments below!