If you’re in the middle of trying to learn React, you have probably run into the “the gap.” As an intermediate beginner, the basic tutorials are too easy now. But it’s hard to figure out what to build.
Another TODO app won’t really teach you much. On the other hand, tackling a huge project that does everything is not a great idea either. It’s easy to get overwhelmed and give up.
In this post I’ll show you 5 projects that you can build on your own, stretch your abilities a bit, and do not involve any todos. Then we’ll go through 1 sample project step by step.
6 React Project Ideas
The best thing you can do at this stage is to choose simple and small apps to build. Aim for quantity over quality. (here are some more ideas on how to practice React and how a great source of project ideas is to copy apps you know and love)
Tooling
I suggest using Create React App (CRA) to bootstrap these projects, but you can also use CodeSandbox if you want something quick and easy.
Styling
To make things look decent, you’ll need to use some CSS. If you don’t already know CSS, or just aren’t very good at it yet, get as close as you can with just HTML. Focus on getting the functionality working, and then work on CSS later.
Alternatively, learn some CSS first, and apply it as you go! (you can also use Tailwind CSS with CRA without having to eject from the nice defaults it gives you).
A great way to improve your CSS skills is by recreating apps that you know and love, pixel by pixel. Do it with intention, though, and isolate the “CSS” part on its own.
An example: if I were going to recreate Twitter for CSS practice, I would not worry about making it interactive. I might even start by lumping all the JSX into a single sprawling component. I’d keep it entirely static until it looks right, and then start adding state andstate and interactivity.
Social Card
We’ll start off with a simple one. This is more of a component than a full-blown app, but it’s a good place to start.
Variations of this UI can be found all over the web – Twitter, Facebook, Pinterest, Airbnb, Redfin, and so on – and it serves as a solid building block for the sort of app where you want to display an image + some data.
It’s also good practice for breaking down a UI into React components.
Once you have a single SocialCard component rendering, try making a list of them with some fake data.
Weather App
Display a 5-day weather forecast, where each day shows the high and low temperatures, and an image for sunny/rainy/cloudy/snowy. Use fake, hard-coded data until you’ve got everything rendering correctly.

You might notice that the “days” look a lot like social cards…
For added practice, here are a few ways you could expand on the app:
- Add the ability to click on a day, and see its hourly forecast. You can just maintain the current view in the top-level App state.
- Add React Router to the project (
npm install react-router) and follow the quick start guide here to add routes, such that/shows the 5-day forecast, and/[name-of-day]shows the hourly forecast for a particular day. - Sign up for a free API key from Open Weather Map, fetch a real 5-day forecast, and feed that data into your app.
- Want to get really fancy? Add a graphics library like vx and follow the examples here to add a graph of the temperature over the course of a week or day.
You can see how this app starts off simple, but can be expanded and customized to increase the challenge and learn specific new skills.
Calculator
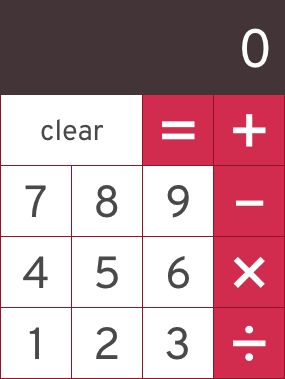
You probably already know how these work. Add, subtract, multiply, divide… Clicking the numbers or the operations should perform the action.
For added challenge, respond to keyboard input too. You shouldn’t need to add an <input> element to make this work. If you do use an <input>, make it so that the user doesn’t need to focus the input control to type into it.
Spend a little time thinking about how the state will be represented. Do you need to store more than just the numbers on the display? When you type a new number, does it replace the display with that number, or append it to the end?
Write some tests to verify the calculator works correctly. (try react-testing-library).
Hacker News Search
There’s the regular Hacker News site, and then there’s the Algolia Hacker News Search. Both are good practice projects.
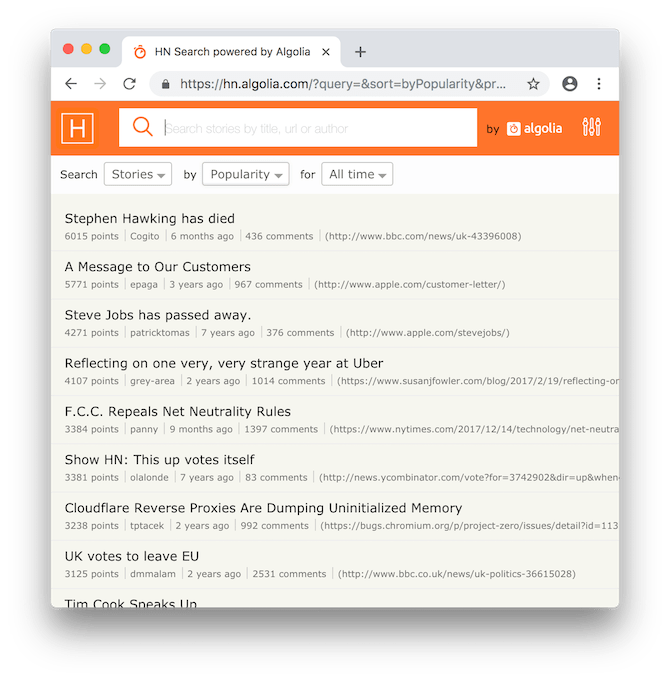
It has been said that all web apps are basically just lists. This app will give you some practice with lists of components that are a little more complicated than todos.
Use static data at first, and then if you want a little more of a challenge, fetch stories from their API. Algolia HN Search has a REST API, and Hacker News exposes stories through a Firebase API.
You could go a step further and replicate their routing structure with React Router.
I’d start by building a static clone of the HN Search site, and once that was working, fetch data from its REST API. Then I might build a static plain Hacker News, and then once that was working, integrate it with Firebase.
I know it’s appealing to learn everything at once, to “streamline” your learning process, but doing it that way actually ends up going more slowly, more often than not. Layer on new things one at a time.
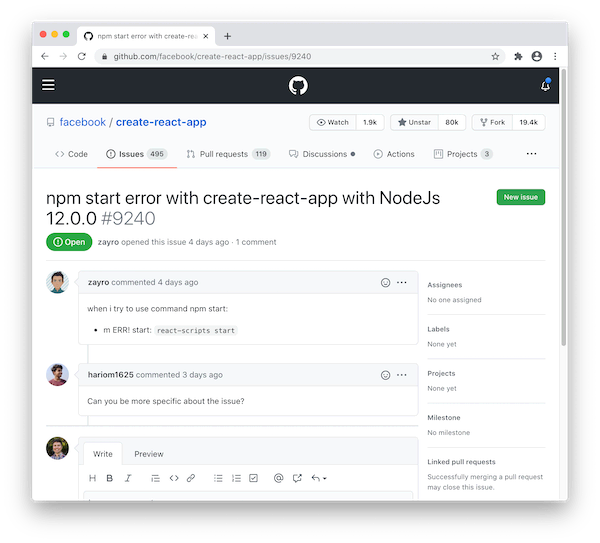
Github Issues Page
Make a simplified version of Github’s Issues page. Here’s an example. To keep the scope small, just focus on implementing the list of issues, and ignore the stuff in the header (search, filtering, stars, etc).
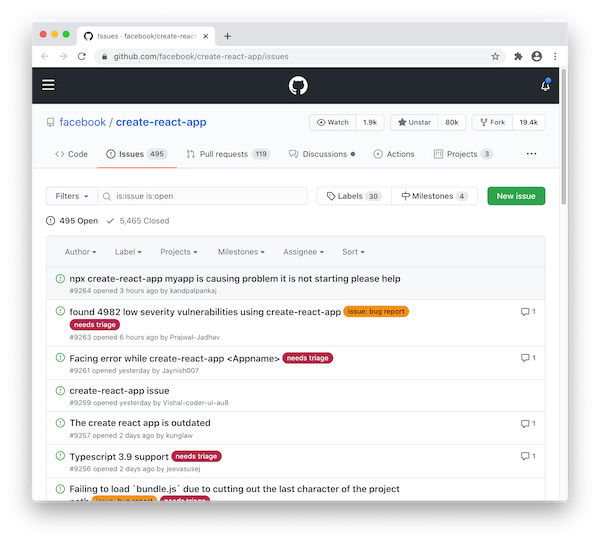
Start by fetching open issues from Github’s API and displaying them in a list. You could use static data for this too.
Then add a pagination control to allow navigating through the entire list of issues. You might find it useful to add React Router too, so that you can navigate directly to a given page.
For added difficulty, implement the issue detail page too. Render the issue’s Markdown text and its comments using something like react-markdown.
Here is a working example using React, Redux, and React Router that implements the features above plus a few more.
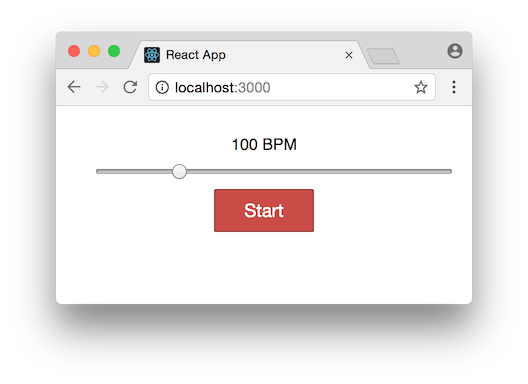
A React sample project step-by-step: Build a Metronome
In this section we’ll build a metronome. It’ll look something like this:
Here are the topics we’ll cover:
- loading sounds [Webpack, JS]
- initializing state in React
- using arrow functions to bind class methods
- interval timers in JS
- how functional setState works, as well as plain setState
- how to trigger an action after state is set
- input components + handling changes [React]
Create the App
We’ll use Create React App to initialize our project. Install it if you haven’t, and then at a command prompt, run:
create-react-app react-metronomeOnce it finishes installing, cd into the directory and start it up:
cd react-metronome
npm start   # or yarn start
Create the Metronome Component
The first thing we’ll do is replace the App component with our Metronome one. In index.js, just replace every occurrence of “App” with “Metronome”.
import React from 'react';
import ReactDOM from 'react-dom';
import Metronome from './Metronome';
import registerServiceWorker from './registerServiceWorker';
import './index.css';

ReactDOM.render(<Metronome />, document.getElementById('root'));
registerServiceWorker();
And then create two new files: src/Metronome.css, and src/Metronome.js.
Leave the CSS file empty for now, and start off Metronome.js with a barebones component to veryify everything is working:
import React, { Component } from 'react';
import './Metronome.css';

class Metronome extends Component {
  render() {
    return <div className="metronome">hi</div>;
  }
}

export default Metronome;
If it’s all working, the app should auto-refresh and you should see “hi”. With that in place, let’s add some UI components.
Render the Metronome UI
I like to take little incremental steps as I build out an app. That way I can always hit Save and see the app work, and if it’s broken, I know what I changed, so I can go back and fix it.
Here’s the next little step: render the metronome’s BPM (beats per minute) slider, and a button, with some static data.
import React, { Component } from 'react';
import './Metronome.css';

class Metronome extends Component {
  render() {
    let bpm = 100;
    let playing = false;

    return (
      <div className="metronome">
        <div className="bpm-slider">
          <div>{bpm} BPM</div>
          <input type="range" min="60" max="240" value={bpm} />
        </div>
        <button>{playing ? 'Stop' : 'Start'}</button>
      </div>
    );
  }
}

export default Metronome;
Then open up Metronome.css and add a little styling to make it look better:
.metronome {
  text-align: center;
  max-width: 375px;
  margin: 0 auto;
  padding: 30px;
}

.bpm-slider input {
  width: 100%;
  margin: 10px;
}

.metronome button {
  background: #c94d46;
  padding: 10px;
  border: 1px solid #832420;
  border-radius: 2px;
  width: 100px;
  color: #fff;
  font-size: 18px;
}
It should look like this:
You won’t be able to change anything yet, because we didn’t implement the onChange handler for the input control. It’s stuck at 100 (the value={bpm}).
Initialize the State
The metronome’s BPM and whether it is “on” or “off” are good candidates to put in React’s state, so we’ll initialize state in the constructor and then use those variables in the render function:
class Metronome extends Component {
  constructor(props) {
    super(props);

    this.state = {
      playing: false,
      count: 0,
      bpm: 100,
      beatsPerMeasure: 4
    };
  }

  render() {
    const { playing, bpm } = this.state;

    return (
      <div className="metronome">
        <div className="bpm-slider">
          <div>{bpm} BPM</div>
          <input type="range" min="60" max="240" value={bpm} />
        </div>
        <button>{playing ? 'Stop' : 'Start'}</button>
      </div>
    );
  }
}
Normally I prefer to initialize state with a property initializer instead of in the constructor, but since we’re going to be creating some Audio objects later on, and the constructor is a good place for that, I’m just going to put the state initialization there too.
Even though we’ve introduced state, the app is never changing that state, so none of the controls will work yet. But it should still render with no errors. One change at a time. Tiny steps! (As you gain experience, you’ll be able to make larger changes confidently, and the size of your “tiny steps” will naturally get bigger)
Update the BPM
To make the slider work, we’ll add a handler function called handleBpmChange to the class, and pass it as the onChange prop to the input, like this:
class Metronome extends Component {
  // ...

  handleBpmChange = event => {
    const bpm = event.target.value;
    this.setState({ bpm });
  }

  render() {
    const { playing, bpm } = this.state;

    return (
      <div className="metronome">
        <div className="bpm-slider">
          <div>{bpm} BPM</div>
          <input
            type="range"
            min="60"
            max="240"
            value={bpm}
            onChange={this.handleBpmChange} />
        </div>
        <button>
          {playing ? 'Stop' : 'Start'}
        </button>
      </div>
    );
  }
}
Now you should be able to drag the slider and watch the BPM change.
This naming convention of “handleX” and “onX” for event handlers is common in the React world. Name things this way in your own code, and you’ll always know whether a prop is a callback function or just regular data. Plus, it’ll be easy to tell which functions are handlers and which aren’t.
Arrow Functions and this
Did you notice that the handler function is declared as an arrow function instead of a plain one? The reason for using an arrow function is that this will be automatically bound to refer to the Metronome instance, and everything will work nicely.
If we’d used a regular function like handleBpmChange() { ... }, then the this binding would be lost when it gets passed to the onChange handler in render.
Chalk it up to an annoying quirk of Javascript: when you call a function as this.foo(), referring to this inside foo will do what you expect. But if you merely pass a reference to a function as this.foo (without calling it), then the value of this gets lost. If the idea of calling vs. passing a reference is confusing, read this quick guide to how references work in JS.
Since event handler functions (like handleBpmChange) are almost always passed around by reference, it’s important to declare them as arrow functions. You can also bind them in the constructor, but it’s a bit more hassle, and one more thing to forget, so I like to use the arrow functions.
Loading the Audio Files
Let’s work on getting the “clicks” playing. First we need to import some sounds, and Webpack can do this for us by adding a couple import statements at the top of Metronone.js:
import click1 from './click1.wav';
import click2 from './click2.wav';
You can download these sounds here:
Then in the constructor, we will create two Audio objects with those files, which we’ll then be able to trigger.
class Metronome extends React.Component {
  // ...

  constructor(props) {
    // ... we're already initializing state ...

    // Create Audio objects with the files Webpack loaded,
    // and we'll play them later.
    this.click1 = new Audio(click1);
    this.click2 = new Audio(click2);
  }

  // ...
}
Testing Audio Playback
I don’t know about you, but I’m itching to hear something! Before we get into starting/stopping a timer, let’s just make sure the audio works.
Add a startStop function to play a sound, and wire it up to call it from the button’s onClick handler:
class Metronome extends React.Component {
  // ...

  startStop = () => {
   this.click1.play();
  }

  render() {
    const { playing, bpm } = this.state;

    return (
      <div className="metronome">
        <div className="bpm-slider">
          <div>{bpm} BPM</div>
          <input
            type="range"
            min="60"
            max="240"
            value={bpm}
            onChange={this.handleBpmChange} />
        </div>
        {/* Add the onClick handler: */}
        <button onClick={this.startStop}>
          {playing ? 'Stop' : 'Start'}
        </button>
      </div>
    );
  }
Click the button a few times. It should play a “click”.
Starting and Stopping the Timer
Now let’s get the timer working, so this thing can actually play a beat. Here’s the new code (replace startStop with this):
startStop = () => {
  if (this.state.playing) {
    // Stop the timer
    clearInterval(this.timer);
    this.setState({
      playing: false
    });
  } else {
    // Start a timer with the current BPM
    this.timer = setInterval(
      this.playClick,
      (60 / this.state.bpm) * 1000
    );
    this.setState(
      {
        count: 0,
        playing: true
        // Play a click "immediately" (after setState finishes)
      },
      this.playClick
    );
  }
};
Here’s how this works:
- If the metronome is playing, stop it by clearing the timer, and setting the
playingstate to false. This will cause the app to re-render, and the button will say “Start” again. - If the metronome is not playing, start a timer that plays a click every few milliseconds, depending on the
bpm. - If you’ve used a metronome before, you know how the first beat is usually a distinctive sound (“TICK tock tock tock”). We’ll use
countto keep track of which beat we’re on, incrementing it with each “click”, so we need to reset it when we start. - Calling
setIntervalwill schedule the first “click” to be one beat in the future, and it’d be nice if the metronome started clicking immediately, so the second argument tosetStatetakes care of this. Once the state is set, it will play one click.
The second argument to setState is optional, and if you pass in a function there, React will call that function once the setState is done and the app has been updated.
You’ll notice this doesn’t play a sound, but rather calls out to this.playClick which we haven’t written yet. Here it is:
playClick = () => {
  const { count, beatsPerMeasure } = this.state;

  // The first beat will have a different sound than the others
  if (count % beatsPerMeasure === 0) {
    this.click2.play();
  } else {
    this.click1.play();
  }

  // Keep track of which beat we're on
  this.setState(state => ({
    count: (state.count + 1) % state.beatsPerMeasure
  }));
};
With those functions in place, the metronome should work! Click “Start” and listen to it click away at 100 BPM.
You can change the tempo, but you’ll have to stop and start the metronome to make the change take effect. Let’s fix that.
Handling BPM Changes
As the user changes the BPM, we can restart the metronome with the new tempo. Update the handleBpmChange function to this:
handleBpmChange = event => {
  const bpm = event.target.value;

  if (this.state.playing) {
    // Stop the old timer and start a new one
    clearInterval(this.timer);
    this.timer = setInterval(this.playClick, (60 / bpm) * 1000);

    // Set the new BPM, and reset the beat counter
    this.setState({
      count: 0,
      bpm
    });
  } else {
    // Otherwise just update the BPM
    this.setState({ bpm });
  }
};
The “else” case here, when the metronome isn’t playing, just updates the BPM. Simple.
If the metronome is playing though, we need to stop it, create a new timer, and reset the count so it starts over. We’re not playing the initial “click” here, immediately after the BPM is changed, because otherwise we’ll get a string of “clicks” as the user drags the BPM slider around.
It works! Kinda.
The metronome works now! Is it perfect? Gig-ready? Well probably not.
If you have a good sense of time, you may notice that this metronome doesn’t. The beats are a little bit off, and inconsistent. The browser’s sense of time with setInterval is not perfect. For an in-depth look at how the JavaScript event loop works, watch this excellent conference talk by Jake Archibald. It’s 35 minutes, but worth it (and funny too). My favorite part is the animations he uses to explain how the event loop works.
Getting the timing rock solid is a bit more work. Check out this project for an idea of how to do it using the Web Audio API. I wanted to keep this post focused on the React aspects, not delve into signal processing 😄
Get the Code
Hopefully you were able to follow along and build this yourself. You won’t learn a heck of a lot by git cloneing example projects and running them, so I encourage you to actually type it out and experiment on your own!
If you realllly just want to download the code though, I won’t stand in your way. But I might glare at you a little.
What’s Next?
The best way I know of to learn a new skill (after you have some grounding in the basics) is to build a bunch of projects. In the design world it’s called copywork and it’s a great learning strategy (and if you want, it’ll help you learn CSS too!).