Coming from Angular, you’re intimately familiar with its built-in directives: ng-if, ng-repeat, ng-class, and all the others that make up a big part of Angular’s appeal.
So if you’ve looked at React, you might’ve noticed that it doesn’t have anything like these. You have to write everything manually. How can you map the Angular directives you know over to React?
In this post we’ll cover how these Angular directives would be written in React (click to jump around):
ng-if
<a ng-if="isLoggedIn" href="/logout">Log Out</a>In React, use the ternary operator (?) or a logical AND (&&). The logical AND can cause errors if the variable is not a boolean, so be careful with that one (or just stick with the ternary operator).
// Ternary operator (?):
function LogoutButton() {
  return isLoggedIn ?
    <a href="/logout">Log Out</a> : null;
}

// Logical AND (&&)
// Careful: isLoggedIn must be a boolean (or null)!
// React components must return an element, or null
function LogoutButton() {
  return isLoggedIn &&
    <a href="/logout">Log Out</a>;
}
ng-class
<p ng-class="computedClass"></p>
<p ng-class="[class1, class2]"></p>
<p ng-class="{'has-error': isErrorState}"></p>
React doesn’t provide something like ng-class, but there is a great library called classnames that does the same and more. Install it:
npm install classnames
Import it however you like:
import classNames from 'classnames';
// OR
var classNames = require('classnames');
// OR if you don't like typing
var cx = require('classnames');
Then it supports things like this (from their docs):
// Replace 'classNames' with 'cx' if you imported it that way
classNames('foo', 'bar'); // => 'foo bar'
classNames('foo', { bar: true }); // => 'foo bar'
classNames({ 'foo-bar': true }); // => 'foo-bar'
classNames({ 'foo-bar': false }); // => ''
classNames({ foo: true }, { bar: true }); // => 'foo bar'
classNames({ foo: true, bar: true }); // => 'foo bar'

// lots of arguments of various types
classNames('foo', { bar: true, duck: false }, 'baz', { quux: true }); // => 'foo bar baz quux'

// other falsy values are just ignored
classNames(null, false, 'bar', undefined, 0, 1, { baz: null }, ''); // => 'bar 1'
And use it similarly to ng-class (also from their docs):
var classNames = require('classnames');

var Button = React.createClass({
  // ...
  render () {
    var btnClass = classNames({
      'btn': true,
      'btn-pressed': this.state.isPressed,
      'btn-over': !this.state.isPressed && this.state.isHovered
    });
    return <button className={btnClass}>{this.props.label}</button>;
  }
});
ng-repeat
<ul>
  <li ng-repeat="item in items">{{ item.name }}</li>
</ul>
In React, use Array’s built-in map function to turn an array into elements.
Pay attention to the special key prop passed to the li. This is necessary for React’s diffing algorithm to work correctly, and you’ll get warnings in the console if you forget the key.
var List = React.createClass({
  render: function() {
    var items = this.props.items;
    return (
      <ul>
        {items.map(function(item) {
          return <li key={item.id}>{item.name}</li>
        })}
      </ul>
    );
  }
});
You can write it as a “stateless functional component” with a little help from ES6’s destructuring and arrow functions, the syntax is even lighter:
function List({items}) {
  return (
    <ul>
      {items.map(item =>
        <li key={item.id}>{item.name}</li>
      )}
    </ul>
  );
}
Either way, use it in a component like this:
function People() {
  var people = [{id: 1, name: 'Joe'}, {id: 2, name: 'Sue'}];
  return <List items={people}/>;
}
ng-click
<a ng-click="alertHello()">Say Hello</a>In React, pass a function to the onClick prop:
var HelloAlerter = React.createClass({
  alertHello: function() {
    alert('hello!');
  },
  render: function() {
    return <a onClick={this.alertHello}>Say Hello</a>;
  }
});
Notice how with ng-click, we pass code to run, whereas with React’s onClick, we pass the function itself. All of React’s events work this way, and React comes with handlers for all the standard DOM events.
The only difference is that they’re named with camelCase like onClick, onFocus, onDragEnter instead of the all-lowercase names from HTML (onclick, onfocus, ondragenter). Check out the React Event System docs for more info.
ng-switch
<div ng-switch="selection">
    <div ng-switch-when="settings">Settings Div</div>
    <div ng-switch-when="home">Home Span</div>
    <div ng-switch-default>default</div>
</div>
In React, just use a plain old JavaScript switch statement. It’s common to extract this into a function to keep the render function tidy.
var Switcher = React.createClass({
  getChoice: function() {
    switch(this.props.selection) {
      case 'settings':
        return <div>Settings Div</div>;
      case 'home':
        return <span>Home Span</span>;
      default:
        return <div>default</div>;
    }
  },
  render: function() {
    return <div>{this.getChoice()}</div>
  }
});
ng-style
<div ng-style="{color: 'red', 'font-size': '20px'}">
  this is big and red
</div>
In React, use the style prop, which gets translated into the style attribute on the actual DOM element.
var StyleDemo = React.createClass({
  render: function() {
    return (
      <div style={{color: 'red', fontSize: 20}}>
        this is big and red
      </div>
    );
  }
});
Alternatively, with the style split out as an object:
var StyleDemo = React.createClass({
  render: function() {
    var styles = {color: 'red', fontSize: 20};
    return (
      <div style={styles}>
        this is big and red
      </div>
    );
  }
});
A couple things to notice about this:
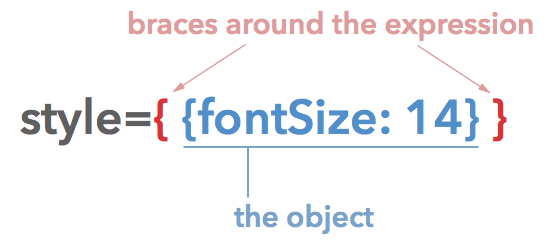
Double braces are an illusion. Despite the appearance of double braces, this is not special syntax! (This threw me for a loop the first time I saw it).
Look at it as passing an object to the style prop. React lets you pass JS inside single curly braces. Passing an object literal inside those single curly braces results in double curly braces.
CSS properties must be camelCased. React automatically turns camelCased properties like fontSize into a font-size that CSS understands.
CSS values can be unitless. Certain properties (like fontSize) will assume a unit if none is provided. In this case the default is px.
Vendor prefixes should be Uppercased (except ms). See the docs.
ng-change
In Angular, you can respond to changes in an input with ng-change.
In React, you can do the same with the onChange event, similar to how we passed a function to onClick above.
However, there’s a difference, and it’s a big one: when your onChange handler is called, nothing has been done yet. You type a letter, React tells you about the change, and then its job is done. It’s literally just telling you that a change occurred, and is not updating the input automatically to reflect that change.
So how do you make an input actually, you know, work? You need to update the state, and pass that state back into the input. It’s a feedback loop.
var AnInput = React.createClass({
  getInitialState: function() {
    return { value: '' };
  },
  handleChange: function(event) {
    this.setState({ value: event.target.value });
  },
  render: function() {
    return (
      <input onChange={this.handleChange} value={this.state.value} />
    );
  }
});
Here’s how that data flow works:
This is probably one of the biggest things to get used to in React – this flow where data goes out and then back in. It seems very counterintuitive at first, and frankly, kind of a pain. Seems like an awful lot of typing to make a simple input control, especially when Angular did all that for you.
However: with great responsibility comes great power.
Want to validate the user’s input before it ever renders at all? You can do that.
Want to force the input to be less than a certain length? You can do that too, and it won’t flicker, because you can truncate the string before calling setState.
Want to make your input look like a credit card number with dashes in between the numbers, and only allow numbers to be entered? Yep.
With Angular you’d need to juggle model values and view values, where small errors cause infinite loops or nothing appears at all.
With React? Just set up the logic in handleChange, and call setState with the string that should appear, given the new input value.
ng-href, ng-cloak
You don’t need these anymore! React won’t show flashes of unpopulated content like Angular sometimes does.
ng-controller
This isn’t necessary in React, since components combine the rendering (the “template”) with the logic. In effect, the component is the controller.
Just because the view and the logic are combined, though, doesn’t mean that everything needs to be piled into the render function. In fact, that’s a bad idea.
Split the logic into methods on your component, and call those methods from render. This is how you’ll keep the render function looking more like a nice, readable template and less like a jumble of badly-written PHP :)
Wrapping Up
I hope this helped clear up some of the differences between Angular’s directives and React’s approach. There’s also a quick reference cheatsheet – put in your email below to grab that.